Entire OnHire
Setting up your Entire OnHire app
Helping you get started with the basics of Entire OnHire.
Skip to...
> Downloading the Entire OnHire app
> How to log in under two accounts on the app
> How to view and update your personal details via the app
> How to view your Payroll Details via the App
> How to upload Documents via the Members App
> How to view and accept released shifts
> Booking shifts
> Setting your availability
> My shifts on the app
> Digital Timesheets
> Shift and Job Timesheet Approvals
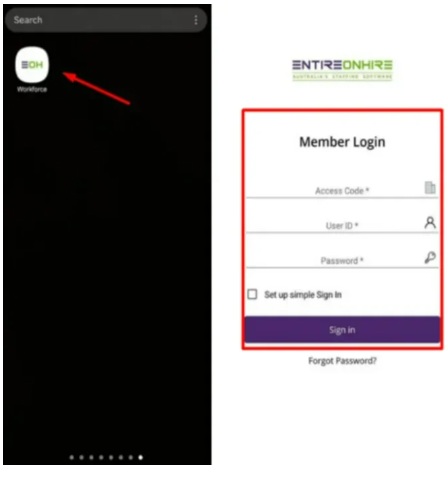
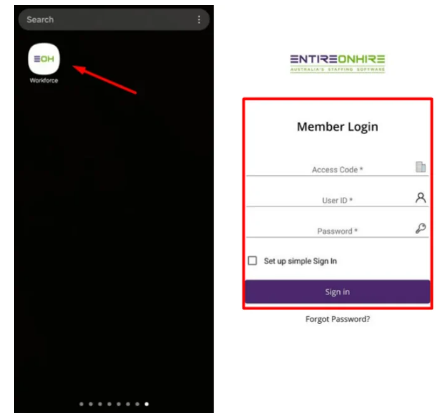
1 - Search for Entire OnHire: Workforce on the App Store
The app will appear as the top link, the icon is shown below - once it appears, select download
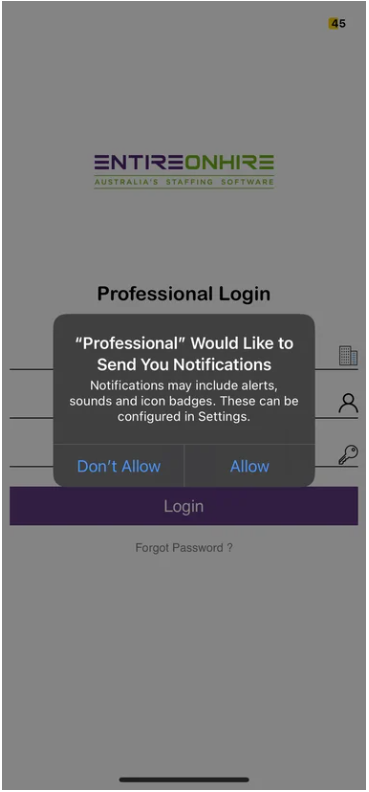
2 - Once downloaded, enable notifications:
This will make sure you never miss out on news about the latest shifts to become available or any news/communication from your agency:
How to log in under two accounts on the app
To log in under two agencies using the app, follow these steps:
Step 1: Log In with First Agency
- Open the app on your mobile device.
- Enter the credentials provided by the first agency to access your account.
- Complete the login process and ensure you can access your profile and other agency-specific features.
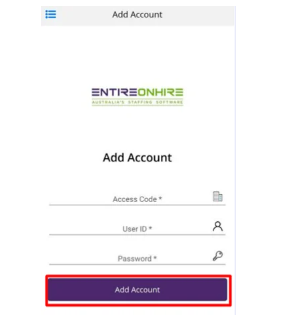
Step 2: Add a Second Agency
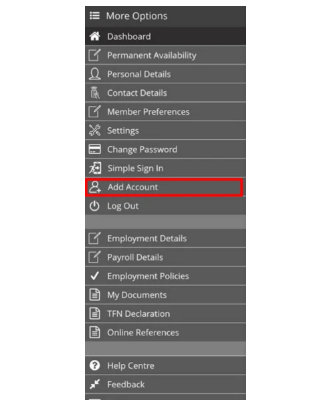
- In the menu, search for the option "Add Account"
Step 3: Enter Second Agency Credentials
- You will be prompted to enter the credentials (username and password) provided by the second agency.
- Fill in the required information and select the "Add Account” button.
Step 4: Choose Agency
- After successfully adding the second agency, you may see a selection menu to choose which agency you want to log in under.
- Tap on the agency you wish to access to switch to that agency's profile and features.
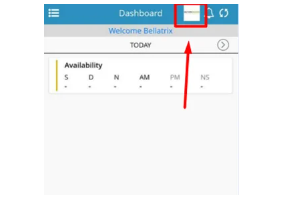
Step 5: Switch Between Agencies
- Now that you have successfully logged in under two agencies, you can switch between them by using the agency selection menu or any agency-specific navigation options provided in the app.

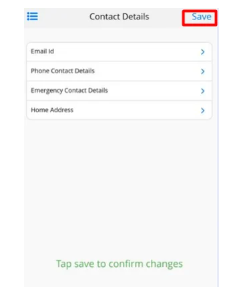
How to view and update your personal details via the app
Step 1: Launch the App
- Open the app on your mobile device. If you haven't logged in yet, enter your credentials to access your account.
Step 2: Access Your Profile
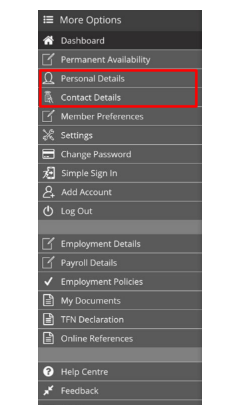
- Look for the little Hamburger Menu and click “Personal Details” or “Contact Details”
Step 3: View Your Personal Information
- “Personal Details” - Once you're in the section, you'll see your existing personal details displayed. This includes your name, gender, DOB and transport details
- “Contact Details” - Once you're in the section, you'll see your existing personal details displayed. This includes email, phone, emergency contact and address

Step 4: Update Your Details and save
- To update any information, just update within the sections and click “Save” in the top right corner.
Important Tips:
- Always ensure that the information you provide is accurate and current to avoid any inconveniences in the future.
- If you have any specific fields or sections that you are not able to edit, they might be restricted by your organization's policies. In such cases, you may need to contact your employer for assistance.
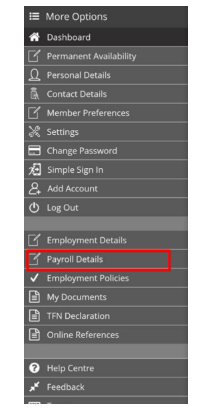
How to view your Payroll Details via the App
Step 1: Launch the Workforce App
- Open the Workforce App on your mobile device. If you haven't already logged in, enter your credentials to access your account.

Step 2: Access the Finance Section
- Look for the “Payroll Details” option in the app's main menu or dashboard. Tap on it to access the Finance section.
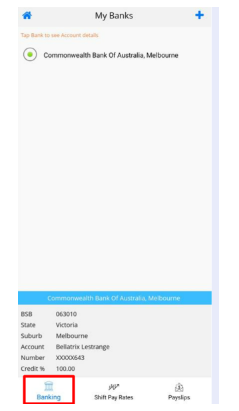
Step 3: Banking Information
- In the Finance section, you'll find the "Banking" option. Tap on it to view or update your banking information, such as your account number, bank name, and other relevant details. Ensuring accurate banking information ensures you receive timely payments.
Step 4: Shift Pay Rates
Explore the "Shift Pay Rates" section to get an overview of the general guide for minimum pay rates for different shifts. Remember that these rates are just a guide and may not represent the true worth of specific shifts. For detailed or specific pay information, consult your employer or HR department.ph

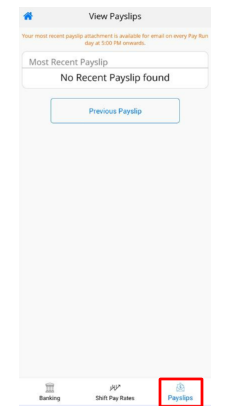
Step 5: Payslips
- In the "Payslips" section, you can access your digital payslips for each pay period. Review and download your payslips to keep track of your earnings and deductions as well as email to yourself.
Important Tips:
- Always ensure your banking information is up-to-date and accurate to avoid any payment delays or issues.
- The Shift Pay Rates in the app provide a general idea of minimum rates, but actual rates may vary based on factors like location, experience, and shift details.
- If you have any questions or concerns about your pay rates or payslips, reach out to your employer or finance department for clarification.
How to upload Documents via the Members App
Within the Mobile App, Members are able to view, update and upload documentation that has been authorised within the Document Master.
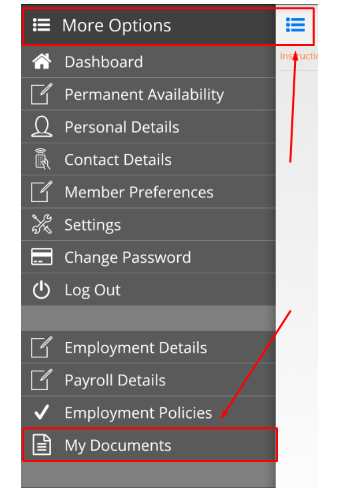
Step 1: Access More Options
Tap the "More Options" icon located in the top left corner of the app. It's represented by three horizontal lines.
Step 2: Find My Documents
Scroll down to locate and select "My Documents" from the options available.
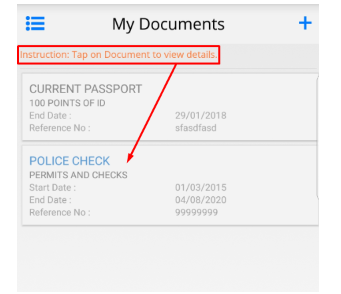
Step 3: View a Document
To view a previously uploaded document, simply tap on the document you want to view from the list.
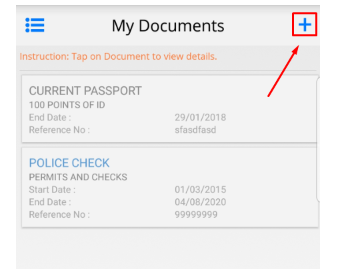
Step 4: Upload or Update a Document
To upload or update a document, click on the "+" sign located in the top right-hand corner of the screen.
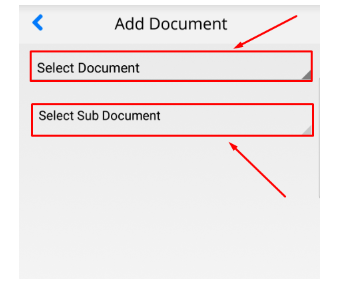
Step 5: Select Document
Type From the drop-down selection, choose the document type and its sub-document name that you wish to upload.
Step 6: Enter Data (If Required)
If any mandatory fields need to be filled, go ahead and enter the necessary data. If it says "(optional)," you can skip this step.
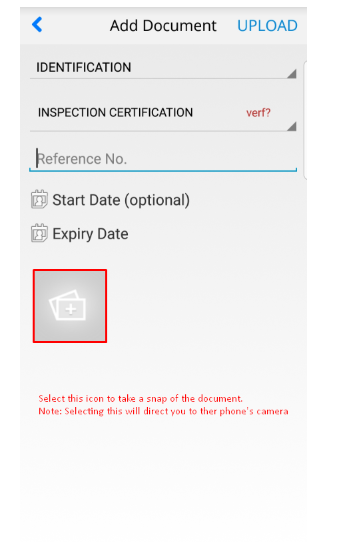
Step 7: Attach an Image
Click on the picture icon to capture an image of the document using your device's camera. This will attach the image to your document.

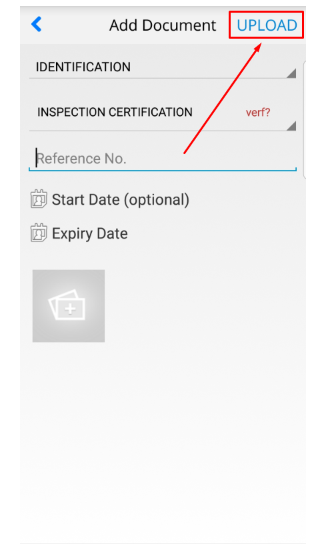
Step 8: Upload the Document
Once you've taken a snap of the document, click on "Upload" in the top right-hand corner to complete the process.
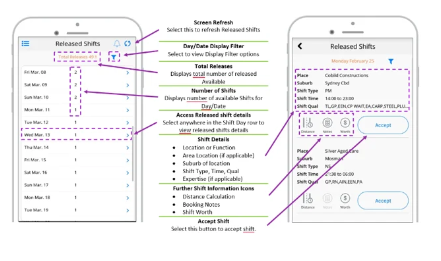
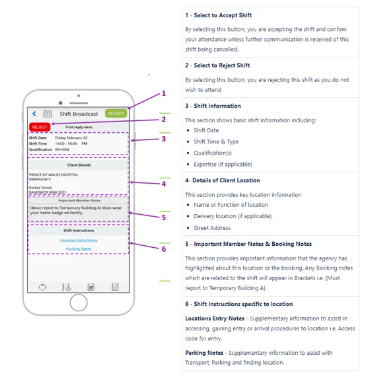
How to view and accept Released Shifts
Released Shifts are different to Assigned or Broadcast shifts as these shifts have been released to all Members who match the Qualification and Preferences of the shift.
It is important to note the system will place the Member who accepts the shift first so get in quickly if you would like it!
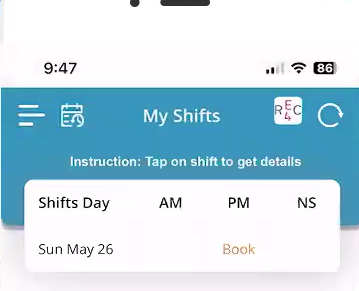
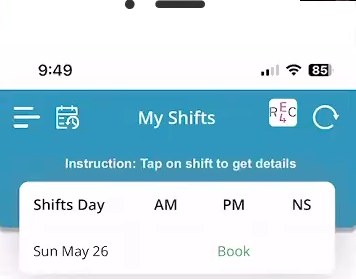
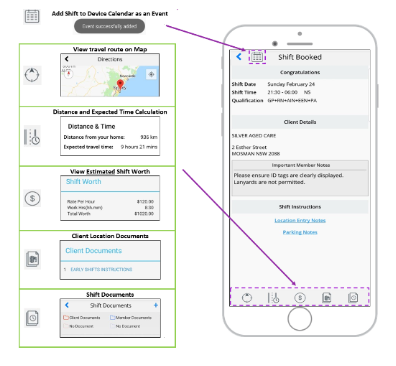
Booking Shifts
Shift requests will be changing to a first-in first-served system. The first person to request the shift will be assigned – but will need to wait until the shift is confirmed with the facility before it will be approved and move from orange to green.
Below screenshots show available shifts, assigned shift and confirmed shifts.
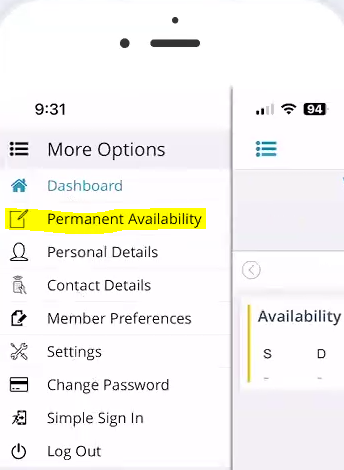
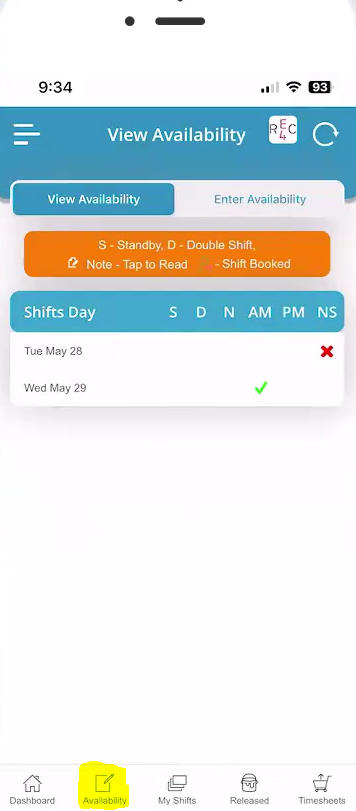
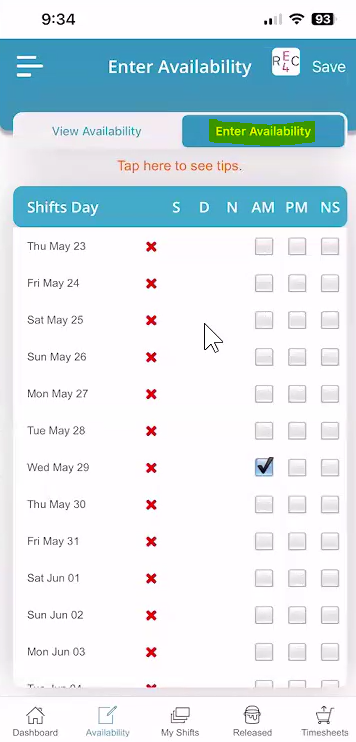
Setting your availability
You will now be able to set permanent and temporary availability. Permanent availability will be your standard ongoing availability which will your ongoing availability. You can put notes in your availability for any specific requests. Temporary availability will notify us of temporary amendments to your permanent availability. You can update your temporary availability up to 30 days in advance.
Updating permanent availability:

Updating temporary availability:
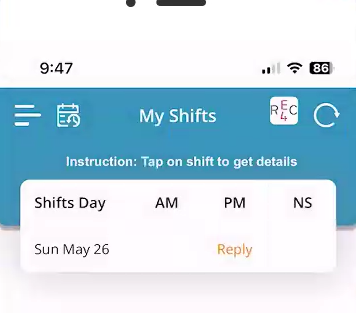
My Shift Screen
Any shifts that appear in the My Shift Screen have been allocated to you or Multiple Members depending on the status. For further information on what each status represents please view below.
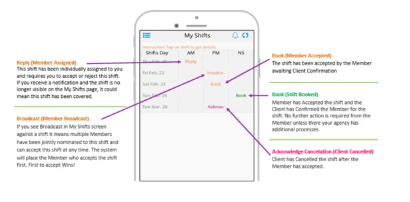
Shift Information
To access the shift information shown on the next page please select the coloured shift Status within the My Shift AM, PM or NS columns.
My Shifts Menu Icons
Digital Timesheet Member App
As a member to receive your pay, you need to be submitting your timesheet at the end of every shift.
By submitting your timesheet via the app you are able to
- Accessing the Timesheet submission Area
- Selecting a Shift to submit a Timesheet against
- Review and Edit Shift details (optional)
- Entering Travel Distance (optional)
- View/Add Documents
- Choosing an authorised supervisor
- Entering supervisor and member signatures
- Confirming and finalising Timesheet submission
To learn how to submit a digital timesheet please follow the steps outlined in this guide. If you need assistance with submitting a timesheet, please contact the Help Centre details found in the top left Menu of your Mobile App.
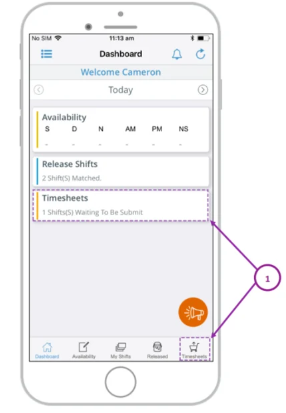
Step 1. Access the Timesheets Submission Area
Select the Timesheets icon on the dashboard or via the Main Access Menu.
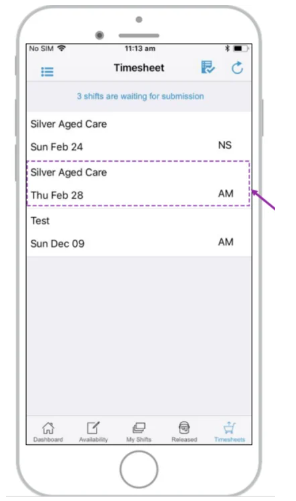
Step 2. Select the Shift
Select the relevant shift you wish to submit a Timesheet for within the Timesheet Submission screen.
Please note shifts will only be displayed on the submission screen once the current time is greater than the booked shift finish time. Meaning you cannot submit a Timesheet prior to the original shift's finish time.
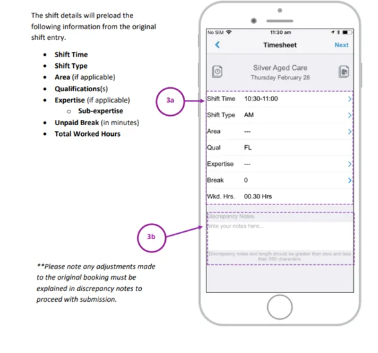
Step 3. Review and Edit Shift Details (Optional)
Review the shift details and select any fields that need to be adjusted from the original booking.
To edit any of the fields (3a) select the applicable field.
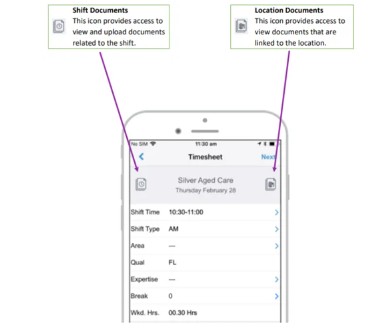
Step 4. View/Add Documents (Optional)
Certain locations and shifts have documents applied that may include instructions for timesheet submissions/protocols.
If required, please view or upload documents by selecting the relevant icons outlined below.
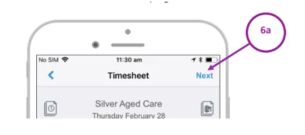
Step 5. Choose Authorised Supervisor
Select the Next button in the top right-hand corner.
This step is either optional or mandatory depending on the client's settings. If applicable choose an authorised Supervisor.
If the Supervisors name is not listed, enter the name in the available box.
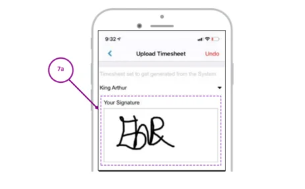
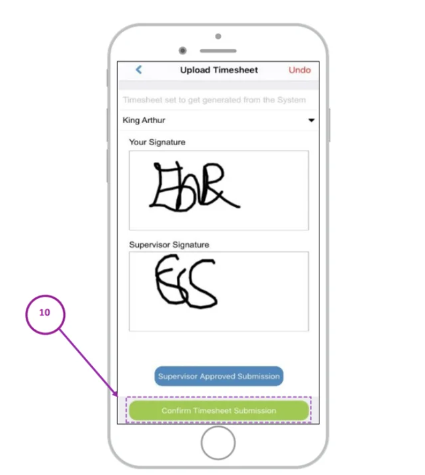
Step 6. Members Signature
Enter your signature in the signature area.
If the supervisor’s signature is mandatory, you will need to select on the Review approved details for the supervisor to authorise the submission details.
The supervisor’s signature is either optional or mandatory depending on your agency’s requirements.
Step 7. Supervisor review
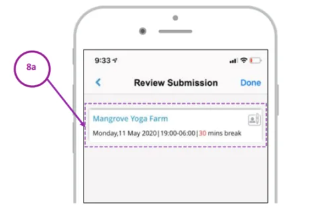
It is a mandatory requirement for timesheets to be authorised. On the selection of review-approved details, the below screen will load. The details of the member's timesheet submission will appear. Any details in red highlight a change from the original booking.
Supervisors will be able to review a detailed description of the submission, they can select the icon highlighted below.
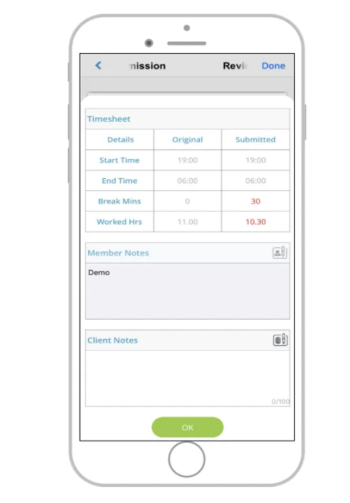
Supervisors review cont.
Below is an expanded view of the shift details for supervisors to review. If any of the details are not correct the member is required to return to their submission to update these.
Supervisors can add notes that will be highlighted to the finance team to review during their validation of shifts for payroll and invoicing.
Step 8. Select confirm timesheet submission
Once all required signatures are entered select the Confirm Timesheet Submission button located at the bottom of the screen.
An Automatic Timesheet Number will be created once the timesheet has been successfully submitted. Press OK to continue using the Members App.
Shift and Job Timesheet Approvals
Shift Timesheet
For the Shift Timesheet, the Review Submission screen now shows the Travel Claims and Shifts Documents details to the Client/ Supervisor when the flag is set as ON respectively.
When the Travel Claim flag is set as ON for the member – The Travel Claim is visible on the Review Submission screen for the Client/ Supervisor, whenever the member adds travel claim details as shown in the figure below.
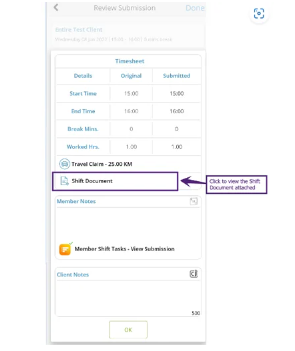
When the Shift Document flag is set as ON for the member – The Shift Document attached by the member is visible on the Review Submission screen for the Client/ Supervisor, whenever the member adds documents.
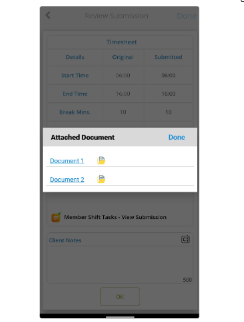
Click Shift Document to view the Attached Document as shown in the figure below.
Job Timesheet
When the Client reviews the Job Timesheet, the Review Submission screen shows the Travel and Notes details to the Client/ Supervisor when the flag is set as ON respectively.
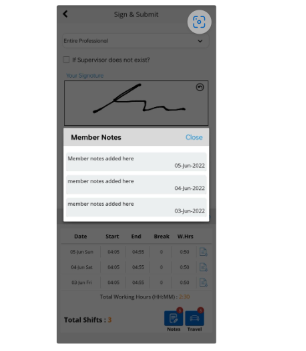
In the Review Submission screen, the timesheet details show the Date, Start time, End time, Break mins., and Total Working Hours. The Travel and Notes icons show the number of Travel Claims and Notes added.

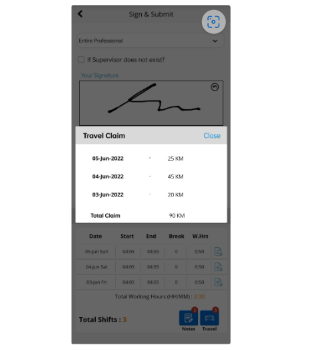
For the Job Timesheet, when the Travel Claim flag is set to ON for the member – The Travel icon is visible on the Review Submission screen for the Client/ Supervisor, whenever the member adds travel claim details.
Click the Travel icon, to view the Travel Claim details.
For the Job Timesheet, when the Notes flag is set to ON for the member – The Notes attached by the member are visible on the Review Submission screen for the Client/ Supervisor, whenever the member adds Notes.
Click the Notes icon, to view the provided Notes.